Message Templates
Before creating the message template, create and configure the WhatsApp Channel (Refer Create WhatsApp Channel to form new WhatsApp channels), so that you can directly create and fetch the approved templates from Facebook portal or Karix server using the Template Id (Waba Id) (refer To View the Message Templates).
Or, you can create your own message template in twixor if it is not an approved template (refer How to Create a Message Template) and approved through Facebook.
Users can utilize the templates to keep track of any changes or offers to their orders or accounts.
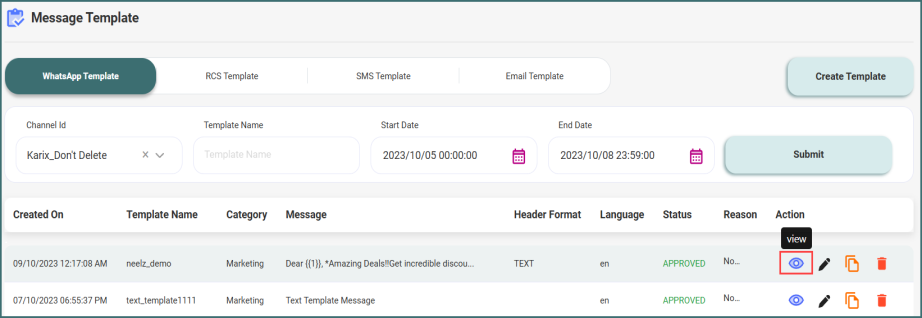
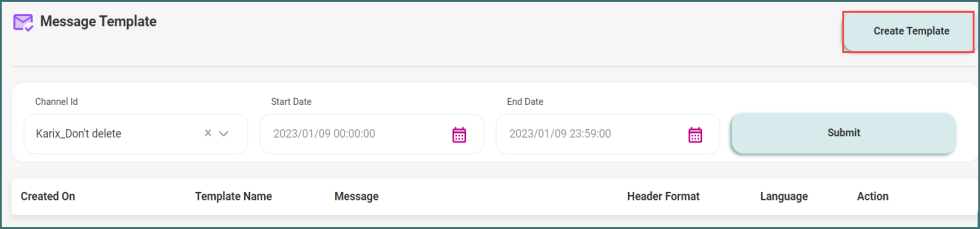
To View the Message Templates
After configuring your WhatsApp channel, you can view the list of templates created using the Channel Id.
Navigation: Admin -> Message Template
1. Select the Channel Id which you have configured in Create Channel page.
2. Choose the Start Date to view the list of templates were created on and shows the approved message templates from Facebook portal.
3. And, click View button to preview the message.
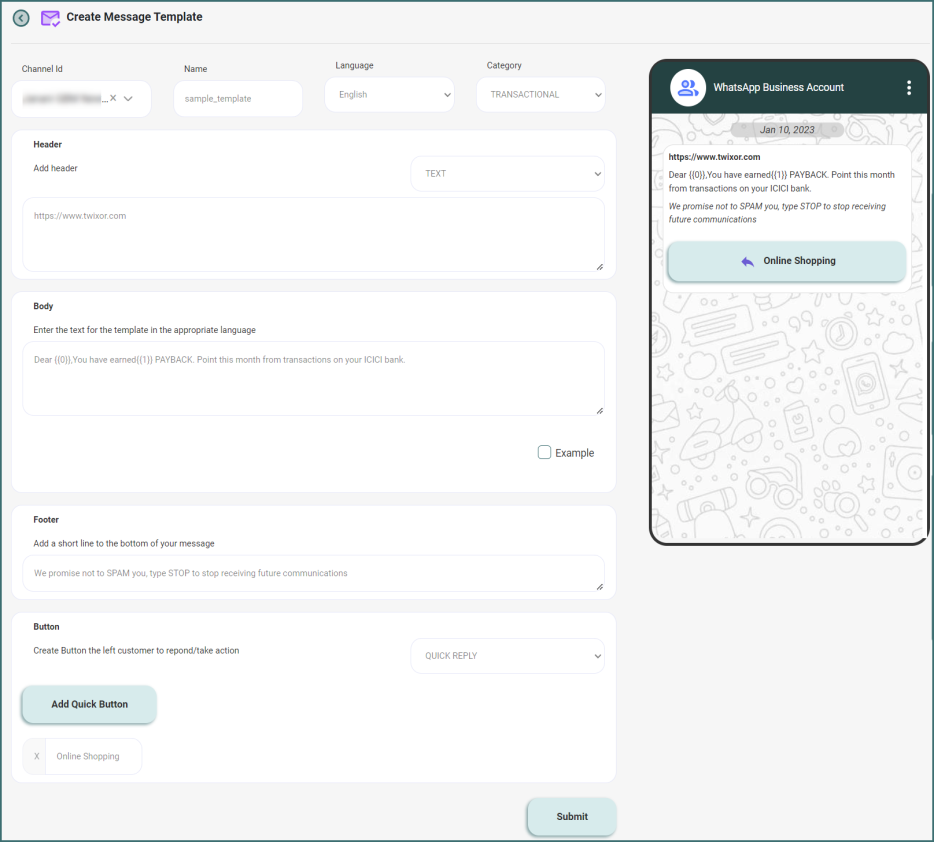
How to Create a Message Template
You can create templates for transactional and to trigger the campaign.
Here, you can create a message template which are approved by Facebook portal for usage in campaigns.
Navigation: Admin -> Message Template.
1. Click Create Template to create a new template.
2. Select the configured Channel Id from the drop-down.
3. Enter the unique Name
Info! Name should contain only lowercase letters and underscores.
4. Choose the preferred language.
5. Select the given Category from the list;
Utility - used to provide practical value and important information in a campaign.
Authentication - used to verify recipient identity for security purposes in a campaign.
Marketing - used to promote products, services, or offers to engage recipients in a campaign.
6. Select the Header file type from the drop-down and add title to use in header.
Info! Images, Documents and Video files chosen here will be uploaded in Create Campaign page.
Variables {{Var}} is not allowed in headers.
7. Enter the body text for the template. You can insert emoji and variables in the message as {{1}}, {{2}}, {{3}}. When sending a campaign using a template, you can replace the variable numbers with the required variable names.
Info! Make sure the variables in Body text starting from {{1}}, {{2}}, …
8. Add the footer text to be displayed in the bottom of your message.
Example: We promise not to SPAM you, type STOP to stop receiving future communications.
Info! Variables {{Var}} is not allowed in footers
While typing the text in body and footer sections, you can able to view the character count, with a limit of 1024 characters for the body and 60 characters for header and footer. And the whole content will be visible in the right-hand side preview panel.
9. To add a button, choose the button type as Quick Reply or Action and click Add Quick Button/ Add Action Button so when the user clicks on the button, a trigger flow will be launched for the specified word. Only a maximum of three Buttons is allowed for a template.
If you need to add a button, choose Quick Reply from the drop-down and add the button name so when the user clicks on the button, a trigger flow will be launched for the specified word.
And select Action from the drop-down to add a link or phone number to your website or event.
10. After filling out all the information, click Submit to save the Message Template.